 SewMendStitch
Mending you are meant to see
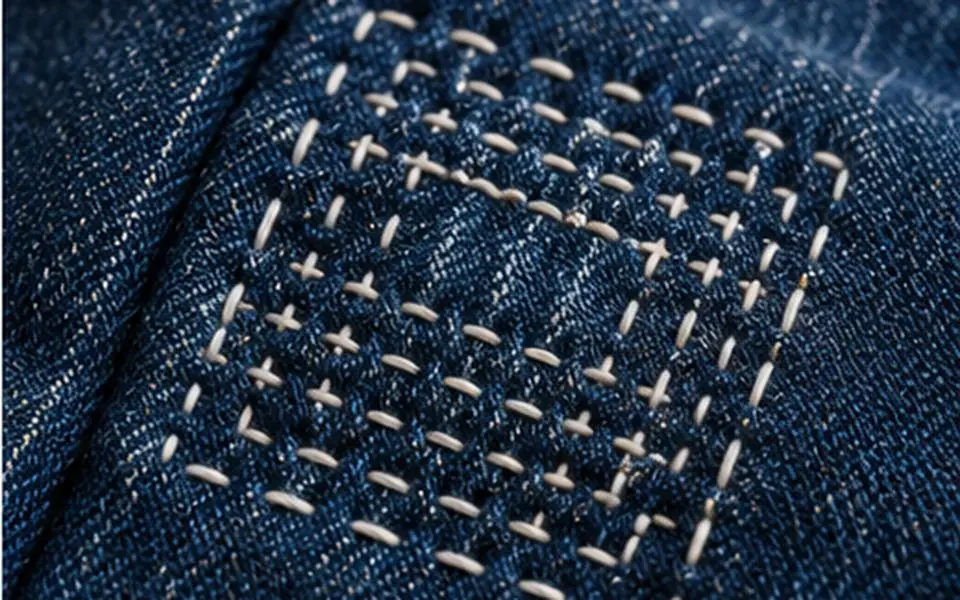
A sashiko coat from Japan's Noto region, made in the late 19th or early 20th century and now in the Museum of International Folk Art, is dark indigo cotton quilted to a lining with white running stitches in concentric rectangles and geometric patterns.3 Nobody tried to hide that stitching. Visible mending works on the same principle: instead of matching thread and hoping the repair disappears, you choose a contrasting thread or patch and make the repair part of the garment.
It is also forgiving for beginners. A hidden repair has to be nearly invisible to succeed. A visible one only has to be strong and reasonably even, and small irregularities read as handwork rather than mistakes. The sections below go through the main styles and the damage each one suits, then walk through a full repair on a jeans knee.
Sashiko: running stitch with a history
Sashiko is a form of running stitch, worked through one or more layers of cloth. The name comes from the Japanese verb sasu, to pierce.2 Cynthia Shaver, writing for the Textile Society of America, traces the oldest known Japanese example to an 8th-century monk's robe kept in the Shoso-in repository, though the record then goes quiet until the 17th century.2 The Embroiderers' Guild of America places sashiko's main development in the Edo period (1603 to 1868), when women in farming and fishing communities used it to repair and reinforce clothing.1 Ordinary people were largely limited to hemp and, later, cotton, and cloth was woven by hand until industrial production reached Japan in the late 1800s, so making it last mattered.1
The stitching did more than mend. Stitching layers together made cloth warmer and much harder-wearing, and people often reinforced cloth before it wore through.2 Firefighters' jackets were made of several stitched layers that could be soaked with water for protection.1 The classic look is white cotton thread on indigo cloth, at roughly 5 to 10 stitches per inch, with the stitch length adjusted to the number of layers.2
Two broad families of pattern exist. In moyozashi, long lines of running stitch form the design; in hitomezashi, short stitches placed on a grid build small, dense repeating motifs that can look woven.1 For mending, simple parallel lines or a grid of moyozashi are the easiest place to start.
Boro: patch upon patch
Boro means tattered, and describes textiles patched again and again until the patches themselves become the fabric.1 The International Quilt Museum describes boro as a way of life in rural Japan before the Second World War, with bed covers and clothing repaired using scraps in many shades of indigo, held down with simple running stitches.4 Its roots were in necessity; the rough, layered look is admired now, but it was not made to be beautiful.4
For modern mending, boro means placing a patch (often behind the hole, so the patch shows through) and stitching it down with rows of running stitch that extend over the surrounding worn cloth. It suits large worn areas and fabric that is thinning in several places at once, such as the seat of trousers or the knees of work jeans. The running stitch lesson covers the only stitch you need.
Darning on woven fabric
Darning rebuilds missing cloth by weaving new threads across a hole. You lay parallel threads in one direction, anchored in sound fabric beyond the damage, then weave a second set at right angles, over and under the first. A University of Idaho extension bulletin from 1923 gives advice still used today: start beyond the end of a tear and make the rows uneven in length, so the darn does not end in a straight line that concentrates stress.6 The craft was once practised on darning samplers, such as a Dutch example from 1820 in the Victoria and Albert Museum, worked in coloured silks on linen with eight darning patterns around an inscription meaning aged 14 years.5
Visible darning uses a contrasting thread, so the woven square becomes a feature. It suits small holes up to about 3/4 in (2 cm) on shirts and trousers, or even tea towels, and thin spots that have not yet broken through. Larger holes are better patched first and then stitched over. The hand darning lesson walks through the weave step by step.
Darning on knits, including Scotch darning
Knits stretch, so a repair on a sweater or sock has to stretch a little too. A simple woven darn works on knits if you use yarn of similar weight and avoid pulling it tight; the knit darning lesson shows this. Scotch darning is a variation described by the UK haberdasher William Gee: you weave rows of running stitch over and under the knitted stitches, alternating direction, and lock each new row to the one before with small knotted loops.7 It needs no preparation, copes with irregular holes and thinning areas, and makes a firm patch for heels and elbows.7 Gee recommends a strong, smooth yarn with good stitch definition, and suggests a yarn slightly thicker than the original for a sturdy, visible result.7
For both methods, a darning mushroom (a smooth wooden dome) inside the garment keeps the area flat while you work. A tennis ball or a small jar is a fine substitute.
Decorative patches and embroidery over holes
Patches can sit on top of the fabric (an applied patch) or behind it, with the hole edges turned or stitched down so the patch shows through. On knits, the Idaho bulletin advises trimming the worn area to a regular shape and cutting the patch to extend 3/4 in beyond the hole on all sides.6 On woven fabric, extend the patch at least as far past any thin, worn cloth around the hole, not just the hole itself. See hand patching for the basic method.
Embroidery over a hole is the smallest-scale option. Cover a small hole with a tight cluster of French knots, a woven wheel or a satin-stitch shape such as a leaf or star. Back the hole with a scrap of lightweight fabric first so the stitches have something to grip. This works best for holes under about 1/4 in (6 mm): moth holes in a knit, or a small burn on a shirt front.
Materials
Sashiko thread is thicker than ordinary sewing thread and is twisted from several fine threads for strength.1 It is often used as one thread doubled through the needle, though a single strand works for a finer line.2 Six-strand embroidery floss, all six strands, makes an acceptable substitute, and perle cotton size 8 or 12 also works well.
Sashiko needles are long, sharp and rigid with large eyes for heavy thread. Clover sells them in a regular-length pack of eight needles in four sizes and a pack of three longer needles.8 The long needle lets you load several stitches before pulling through, which is how even sashiko spacing is achieved. A thimble helps when pushing a long needle through denim. For darning, use a blunt tapestry or darning needle on knits and a sharp one on tightly woven cloth. Patches should be similar in weight to the garment and washed first so they shrink before they are attached.
Choosing a style for the damage
| Damage | Best style | Why |
|---|---|---|
| Hole under 1/4 in (6 mm) | Embroidery over the hole | Small enough to cover with knots or a motif |
| Small hole or thin spot in woven cloth, up to 3/4 in | Woven darn | Rebuilds the cloth without adding a layer |
| Hole in a sweater, sock heel or elbow | Knit darn or Scotch darn | Keeps some stretch; firm on high-wear spots |
| Hole over 3/4 in in denim or canvas | Patch behind plus sashiko lines | Patch bridges the gap; stitching holds the worn surround |
| Large area thinning in several places | Boro layering | Several overlapping patches spread the load |
| Torn pocket edge or seam | Not a visible-mend job | Use a structural repair first |
When a garment has a mix of damage, choose the style for the biggest problem and use it consistently, so the repairs look planned. If a hole is next to a seam or pocket, the reinforcing worn areas lesson explains how to strengthen the surrounding fabric.
Worked example: a 1.5 in hole in a jeans knee
The knee is the classic visible mend. It takes bending stress all day, so the repair has to cover more than the hole. Here is a plan for a 1.5 in (38 mm) hole, using a patch behind and sashiko-style lines. The denim hole lesson and jeans patch lesson cover the basics in more detail.
- Assess the worn area. Press the denim around the hole between your fingers. Usually the cloth is thin for about 1/2 in beyond the edge, so the damaged zone is about 2.5 in across.
- Size the patch. Add 1 in of sound fabric on every side of the damaged zone: 2.5 + 1 + 1 = 4.5 in. Cut a 4.5 by 4.5 in (11.5 cm) square of washed denim or sturdy cotton, or 5 by 4.5 in if the hole is a horizontal split, since knee tears tend to spread sideways.
- Trim loose threads, but leave the frayed edge of the hole in place; it will be stitched down.
- Pin and tack the patch inside the leg, centred under the hole. Slip a darning mushroom or small hoop inside to keep the layers flat, since the leg is a narrow tube.
- Mark lines. With chalk, draw horizontal lines 1/4 in (6 mm) apart across the patch area. That gives 18 lines over 4.5 in.
- Stitch. Use sashiko thread, or all six strands of floss, in a long sashiko needle. Aim for about 6 to 7 stitches per inch (stitches roughly 3 to 4 mm long), which sits within the traditional range.2 Make the stitches on top slightly longer than the gaps beneath.
- Leave ease. At the end of each row, leave a tiny loop of thread rather than pulling taut. Denim at the knee stretches when you bend, and a tight row will pucker or snap.
- Secure the hole edge. Where rows cross the open hole, they hold the patch flat. Add a second set of rows at right angles over the hole itself if you want a grid.
Thread needed: 18 rows of 4.5 in, plus the back and a starting tail, comes to about 4 yd (3.7 m) of sashiko thread. Expect the mend to take two to three hours by hand. Wash the jeans inside out afterwards, and check the stitching after the first few wears; if a row has pulled tight across the bend, add a few stitches between rows rather than restitching the whole patch.
Common mistakes
- Patching only the hole. The worn cloth around it will give way next, usually within weeks on a knee.
- Pulling running stitches tight. Visible mends on knees, elbows and seats need slack to move.
- Using unwashed patch fabric that shrinks in the first wash and puckers the repair.
- Darning a knit with stiff, smooth thread that cannot stretch, so the darn pulls away from the soft stitches around it.
- Starting rows at the edge of the hole. Begin and end every row in sound fabric.
- Choosing a patch much heavier than the garment, such as canvas on a light chambray shirt.
If a mend starts to fail, it is usually at one edge. Run a new row of stitches 1/4 in outside the old ones before the fabric there wears through.
Sources
- Embroidery Techniques from Around the World: Sashiko, Embroiderers' Guild of America
- Sashiko: A Stitchery of Japan (Cynthia Shaver, Textile Society of America Symposium Proceedings), University of Nebraska-Lincoln DigitalCommons
- Sashiko Coat, Museum of International Folk Art
- BORO: The Hidden and the Visible in Japanese Mended Textiles, International Quilt Museum
- Darning Sampler, Netherlands, 1820, Victoria and Albert Museum
- Third Clothing Bulletin, Extension Bulletin No. 56, University of Idaho Extension Division
- Visible Mending Series: Basic Scotch Darning, William Gee
- Sashico Needles and Thimbles, Clover Needlecraft
Links were checked when this guide was last reviewed. If one has moved, please let us know. How sources are chosen: editorial policy.